In this getting started project, you’ll learn how to use Inkscape, a free graphics application, to turn a hand drawing, clipart, or typed text into an SVG file you can engrave onto an anodized aluminum dog tag, using the Bantam Tools Desktop CNC Milling Machine. This project requires very little setup and milling time to achieve a finished product. Though we’re using Inkscape, if you have access to Adobe Illustrator, you can use a similar workflow.
In this guide we'll cover:
- Creating an SVG design in Inkscape
- Setting up an SVG job on the Bantam Tools Desktop CNC Milling Machine
- Using double-sided Nitto tape
- Creating a custom tool in the Bantam Tools Tool Library
Tools
- Bantam Tools Desktop CNC Milling Machine unboxed and set up
- Computer with Bantam Tools Desktop Milling Machine Software installed on your computer
- Inkscape or Adobe Illustrator downloaded onto your computer (optional)
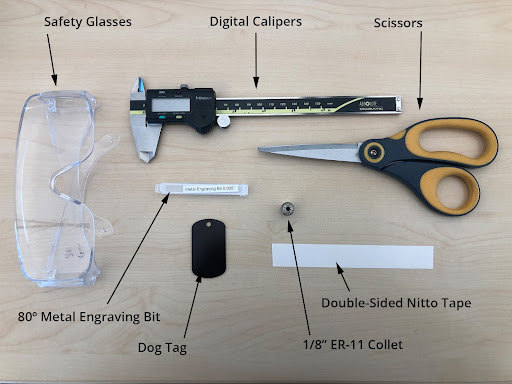
- Metal engraving bit, 80°, 0.005"
- ER-11 collet, 1/8”
- Digital calipers
- Scissors
- Safety glasses
- Scraper
- 91% Isopropyl Alcohol (optional)
Materials
Files
There are a variety of options for you to choose from when it comes to creating your SVG design:
- Downloading a clip art design and format it in Inkscape or Adobe Illustrator
- Drawing your own design, taking a picture, and formatting it in Inkscape and Adobe Illustrator
- Creating your own design from scratch in Inkscape or Adobe Illustrator
Depending on the option you choose, we have an SVG design that’s already been formatted and ready to import into our Bantam Tools software. On the other hand, we’ve also provided templates you can use to design your own SVG
- Bantam-Tools-Rooster-Dog-Tag.svg file
- Printable PDF to draw your design by hand
- SVG dog tag template to create your own design in Inkscape
Step 1: Create your design.
If you’ve decided to download the Bantam-Tools-Rooster-Dog-Tag.svg and are ready to start setting up your first job, feel free to skip ahead to Step 5. If you want to create a custom SVG design, read on!
A Note About the Bantam Tools Milling Machine Software
By themselves, SVGs are just 2D drawings that the Bantam Tools software can interpret and generate toolpaths for. Any object in an SVG file with a border or fill will be machined. We refer to the inside shapes as fills and the outside shapes as strokes. The Bantam Tools Milling Machine Software looks at strokes and fills to determine the inside and outside of shapes in a design.
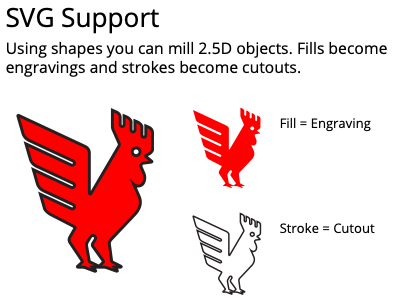
The Bantam Tools Milling Machine Software can interpret SVG files in two ways: classic and advanced SVG handling. Classic SVG handling reads fills as engravings and strokes as cutouts. Advanced SVG handling allows you to do multiple cutout operations in one file using color coding. The Bantam Tools software combines the resulting shape with the tools you’ve selected, as well as the scaling, placement, and any other settings you specify. It then calculates the toolpaths that the Bantam Tools Desktop CNC Milling Machine will follow.
Both the classic and advanced SVG support are intended for closed paths. Any paths in your design with unjoined ends will be joined by our software as part of its pre-processing. Check to make sure all paths are joined as intended before importing the design into our software.
For this getting started project, we’re going to use the classic version of our built-in SVG support. We’ll use the advanced SVG workflow in later getting started projects.
Ready? Let’s start designing!
Step 2: Layout your design in Inkscape.
A new document will automatically be created. When you save this document, Inkscape’s default is to save it as an SVG file, which is great since this is the file type you want.
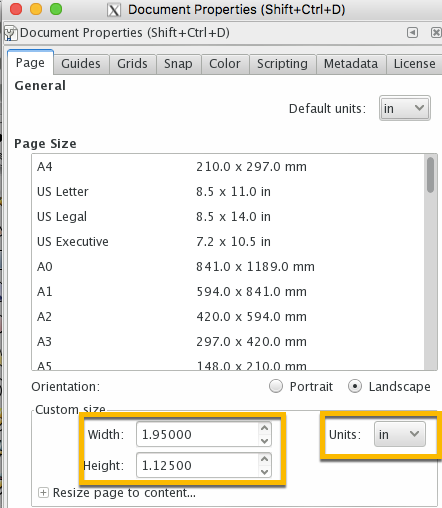
Before you start designing, manually set your canvas dimensions:
- Go to File > Document Properties.
- In the Custom Size window, change the units to inches (in).
- Set the width to the dimensions of your choosing. We like to set our dimensions according to the size of our dog tag. To measure the dimensions of your dog tag, use your digital calipers and enter them into the pop-up window
When you're done, save your file.
Now it’s time to either design or pull in your artwork. If you’re using a photo of a drawing or clipart from the internet:
- Bring your design into Inkscape by clicking File > Import.
- Use the Select and Transform tool to select, move, and scale objects, and use the Text Tool to add text.
On the other hand, if you’ve created your design in Inkscape you don’t need to import anything. This design is called your “bitmap design.”
Step 3: Turn your bitmap design into a vector path.
- Bitmap: a graphic made up of rows of different colored pixels to form an image
- Vector Path: a graphic made up of shapes, curves, lines, and/or text to form an image
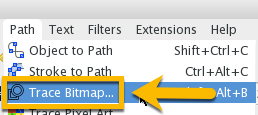
Next, you’ll need to turn your bitmap design into vector paths so that the Bantam Tools Desktop CNC Milling Machine will be able to mill it. To convert photos of drawings or clipart into paths, click on the image, then select Path > Trace Bitmap.
In the pop-up window, check the box next to Live Preview and adjust the Threshold settings until the design contains the level of detail you’d like. Click OK and close the window to continue designing.

Using the Edit Paths By Nodes tool in the left-hand tool bar, click on the vector path to confirm it’s now a collection of vector paths. You should see lots of little gray squares that represent nodes of the vector. If you don’t see these little gray squares, something went wrong, and you should go back and try using the Trace Bitmap option again. The vector path you just created with the Trace Bitmap feature will now be in front of the original image. Delete the original image.
If your design contains text that you made in Inkscape––like we did for our Pocket Machinist Rule getting started project––you’ll need to convert it to vector paths, as well.
- Highlight the text.
- Click Text > Put on Path.
- Click Path > Object to Path.
Step 4: Fine tune your layout.
Adjust the size and layout of your design until you like the way it looks. To adjust the size, click on the Select & Transform tool (the black arrow), then click on one of the arrows that surround the object you want to shrink or enlarge. If you hold down the Control key, the proportions will stay locked as you change the object’s size.
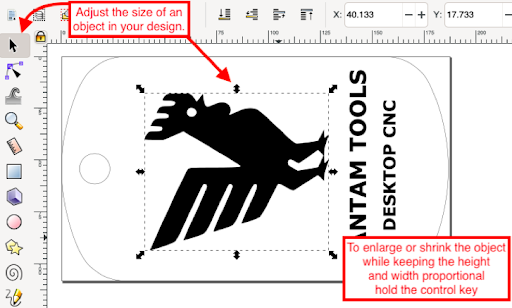
Note: The dog tag has a hole. Make sure your design isn’t located over this hole.
When you’re finished, save your SVG file.
Save Settings for Illustrator Users
If you’re using Inkscape to create your SVG file, you can skip to the next step. However, if you’re using Illustrator, you’ll want to make sure you save your design correctly. Click File > Save a Copy > Choose SVG. Then select the following settings
- SVG Profile: SVG 1.0
- Font Type: Convert to Outline CSS Properties: Style Attributes
- Decimal Places: 3
Step 5: Load and set up your SVG file into the Bantam Tools Milling Machine Software.
Let’s get milling! Connect your computer to the Bantam Tools Desktop CNC Milling Machine and launch the Bantam Tools Milling Machine Software. Turn on your machine and open the software. When the software wizard launches it will prompt you to Home the machine. The homing process is incredibly important because it tells the Bantam Tools Desktop CNC Milling Machine where all its parts are, which allows you to machine accurate, professional-grade jobs!
When you’re finished homing the machine, go to the Initial Setup tab, click Open File, and select the SVG file you want to machine.
A dropdown menu will appear asking you to select your end mill and specify your settings. For this getting started project we’re going to focus on Engraving, Cutout, and Engraving Depth. If you’d like to learn more about each of these settings see our Classic & Advanced SVG Workflows guide.
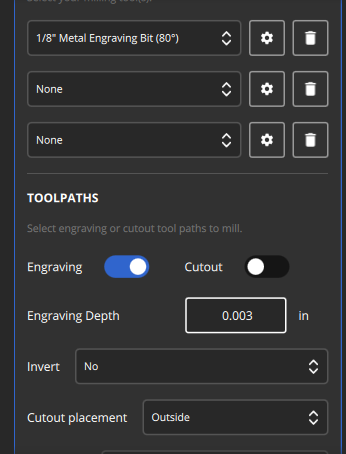
- Engraving: These are filled areas and strokes to the depth specified in the Engraving Depth setting.
- Cutout: This tells the Bantam Tools software that you want to cut the outermost shape of your design and you want to cut through the entire thickness of the material.
- Engraving Depth: How deep you want your 80º metal engraving bit to cut into your dog tag. The depth you choose will depend on your design, but we typically like to set our engraving depth to 0.003”.
Complete the following steps to set up your file:
- Click the tool dropdown menu and select your end mills.
- Deselect Cutout
- Set the Engraving Depth to 0.003”
When you’re done, your file setup should look similar to this. Depending on your design, you may need to select different tooling or multiple end mills.
Step 6 (Optional): Creating a custom tool in the Bantam Tools Tool Library
When working with SVG files, the speeds and feeds will be taken directly from the built-in Bantam Tools Tool Library. The Tool Library allows you to customize your feeds and speeds without having to program CAM in software. This becomes helpful if you want to optimize your machining time or if you’re frequently using specific tools with certain materials.
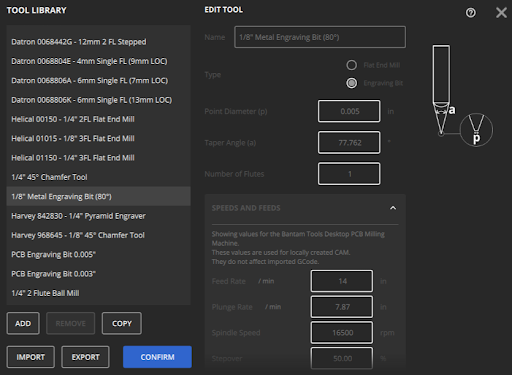
If you’d like to create your own custom tool. For this example we’ll show you how to create a custom 80º metal engraving bit. Here are the steps:
- Go to the Setting tab and select the Tool Library button.
- Click Add. When you do, a new tool will appear under “Custom Tools”
- Name your tool. We find it helpful to include the size of the cutter diameter, the type of tool, and the material we plan to use it with.
- Select “Engraving Bit.”
- Enter 0.05” for the Point Diameter.
- Enter 77.762º for the Taper Angle.
- Now enter the follow values for the speeds and feeds.
The speeds and feeds values you'll want to enter are:
- Feed Rate: 50 in
- Plunge Rate: 10 in
- Spindle Speed: 25,000 RPM
- Stepover: 50%
- Pass Depth: 0.003 in
- Ramp Angle 1º
When you’re satisfied, click Confirm to save your tool. If you ever want to edit the custom tools you’ve created, select them in the Tool Library and update the speeds and feeds accordingly.
Step 7: Set up your material.
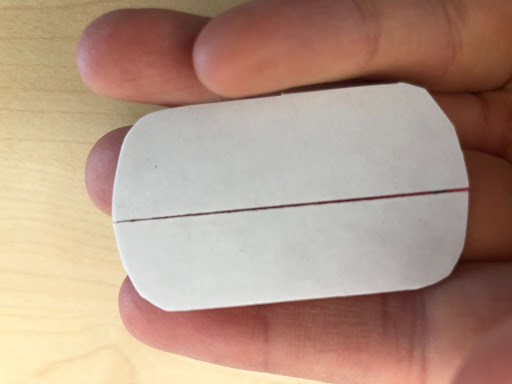
Time to fixture your material in the Bantam Tools Desktop CNC Milling Machine. Navigate to the Material Setup tab in the Bantam Tools software. For this step you’ll need your dog tag, a strip of high-strength, double-sided Nitto tape, and digital calipers.
Complete the following steps:
1. Using your digital calipers measure the dimensions of your dog tag.
2. Enter your X, Y, and Z dimensions under the Material Size dropdown menu in the Bantam Tools software’s Material Setup tab.
3. Peel the paper off one side of the double-sided Nitto tape and place it onto the dog tag. Make sure it is completely flat. Any ripples or bubbles will cause the engraving depth you entered won’t be consistent across the whole design—in some cases, it could even break your 80º metal engraving git.
4. Peel off the paper on the other side of the double-sided Nitto tape.
5. Align the dog tag onto the front, right corner of the Bantam Tools Desktop CNC Milling Machine’s T-slot bed and press it down firmly.
IMPORTANT: To account for the thickness of the Nitto tape, enter the tape thickness measurement in the software in the Material Placement’s Z Offset field. High-strength double-sided tape tends to be 0.006" thick.
Tip: Before you begin fixturing, always make sure the T-slot bed is free of dust, swarf, glue, or anything else that might prevent the tape from sticking or the material from laying flat.
Step 8: Install your end mill.
You’re doing great! You’re almost done setting up your job. But before you can start milling, you have to install and locate your end mill. To this complete the following steps:
- Go to the Jog tab and click the Install Tool button. The spindle will move to the center of the Bantam Tools Desktop CNC Milling Machine.
- Loosen the collet nut about halfway.
- Slide the tool (with 1/4” shank) into the collet all the way until it stops. Then back off ever so slightly.
- Use your fingers to tighten the collet nut with the tool inserted.
- Then use the collet wrenches that come with the machine to tighten the tool until it’s snug, but be careful not to over tighten it.
- Click Next, and the spindle will move to the default tool touch-off location at the front right corner of the bed. Confirm that nothing is blocking the tool, and then click Start.
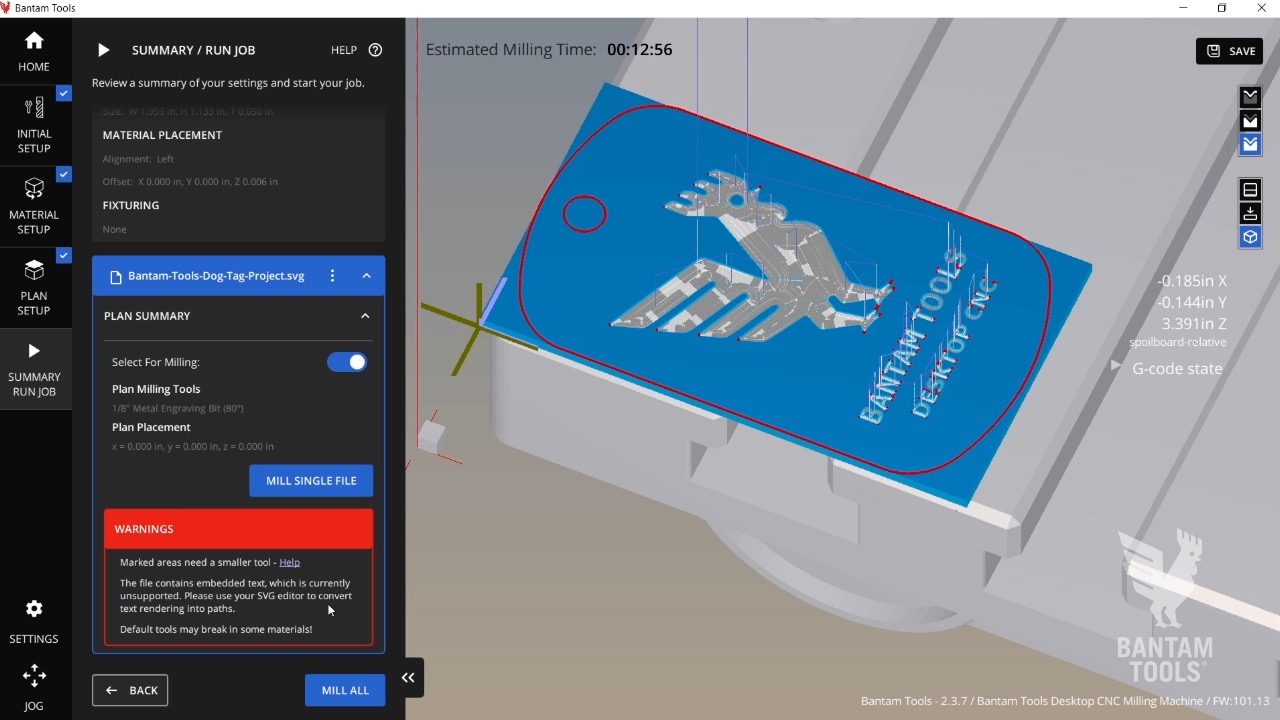
Step 9: Review your job.
Make sure all the tabs on the left-hand side of the software wizard are checked off. Remember, these let you know you've entered the necessary information to set up your job. One of the great things about the Bantam Tools Milling Machine Software is that it tells you whether or not you’ve entered all the necessary info to start milling.
The Summary tab will reflect the information you've input and the settings you've configured, so be sure to review it before you start machining to make sure the info and settings are correct. Before you start milling, head to the Summary/Run Job tab to review your setup and confirm that the preview looks correct.
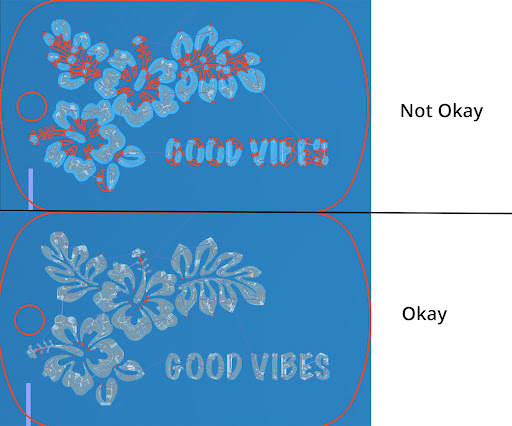
A Note About Red Warnings
Sometimes red warnings mean you need to go back to your design and change something so that all of your features can be correctly milled. If this is the case, you’ll need to select smaller tooling. For most engravings the 80º metal engraving bit will be able to handle the job because it has a fine cutting tip.
If you zoom in on the letters, you’ll see small red marks indicating that certain corners will be rounded rather than squared. In this case, the corner won't affect the functionality of your board, so you can ignore the warning.
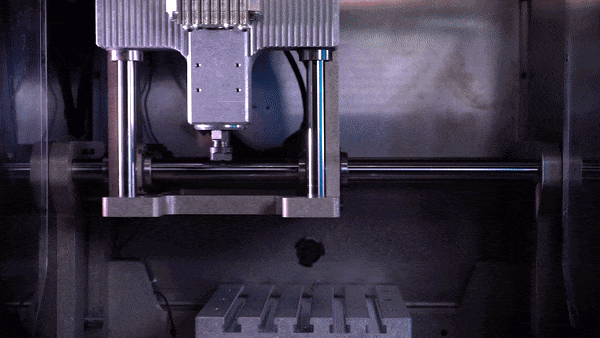
Step 10: Start milling!
Before you continue, be sure to put on your protective eyewear. While the Bantam Tools Desktop CNC Milling Machine is enclosed, it’s always good practice to use caution. If you’re happy with how everything looks, close the Bantam Tools Desktop CNC Milling Machine's loading door. Then go to the Summary/Run Job tab to review your setup.
When you're ready, click Mill Single File.

Step 11: Remove your dog tag out of the Bantam Tools Desktop CNC Milling Machine.
When your job is finished, squirt some 91% isopropyl alcohol around the edges of the dog tag. This will help loosen the double-sided Nitto tape’s adhesive and make it easier to remove your tag from the T-slot bed. If you have a scraper, this will also be helpful in removing your project from the bed.