The Bantam Tools Desktop CNC Air Blaster Accessory increases chip evacuation and airflow and attaches seamlessly to the Bantam Tools Desktop CNC Milling Machine’s spindle house assembly. When hooked up to a compressor, this accessory clears the milling surface of debris and decreases cycle times. It also improves material finish and increases tool life.
The Bantam Tools Desktop CNC Air Blaster Accessory increases visibility of part features while machining. It’s ideal when milling heavier materials like aluminum or brass, or when machining larger chips. If you’re machining parts using operations that create fine dust, the Bantam Tools Desktop CNC Vacuum Accessory would do a better job of managing this debris.
While the debris will remain inside the enclosure, fine-dust-generating materials can cause the debris to lodge into components that can lead to more wear and tear on the Bantam Tools Desktop CNC Milling Machine.
Important: Be diligent with using consistent and proper cleaning practices when using the Bantam Tools Desktop CNC Air Blaster Accessory. For more insight into best cleaning practices, see our Safety, Cleaning & Maintenance guides at the end of this article.
In this guide we will cover:
- Anatomy of the Bantam Tools Desktop CNC Air Blaster Accessory
- Choosing an air compressor
- How to install the Bantam Tools Desktop CNC Air Blaster Accessory
- Deinstallation
Anatomy of the Bantam Tools Air Blaster Accessory
Now it’s time to take a closer look at the different parts of the Bantam Tools Desktop CNC Air Blaster Accessory. If you’ve used other CNC air blasters before, feel free to skip to the next section.
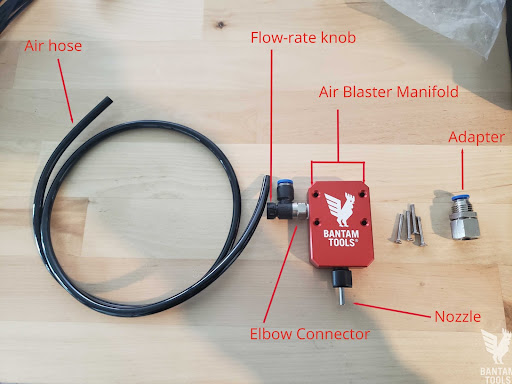
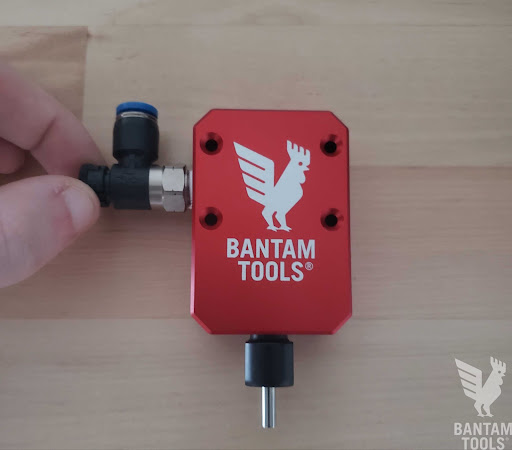
Note: Do not adjust the elbow connector on the side of the air blaster manifold. This is factory-sealed at our HQ in Peekskill, NY.
Choosing a Compressor
The Bantam Tools Desktop CNC Air Blaster Accessory doesn't come with a compressor. You will need to source your own compressor and the appropriate fittings and air hose to connect to your air compressor.
The compressor you choose will depend on your needs. A compressor rated to provide 3 scfm or higher at 40 psi will be adequate for machining aluminum parts with deep pocket features and long cycle times. You can use a compressor or air pump that is rated lower than these numbers but keep in mind the rated duty cycle of your compressor to ensure its maximum life. We recommend overspecing rather than under-specing your compressor.
Installing the Bantam Tools Desktop CNC Air Blaster Accessory
To install the Bantam Tools Desktop CNC Air Blaster Accessory, you'll need the following tools:
- Allen key, 2 mm
- Wirecutters
Connect the Bantam Tools Desktop CNC Milling Machine to your computer, load the Bantam Tools Milling Machine Software, and home the machine. If you have an end mill or probing pin installed, remove it. Also, make sure the machine bed doesn’t have any material or fixtures attached to it. Complete the following steps to install the Bantam Tools Desktop CNC Air Blaster Accessory:
Using the Jog tab in the Bantam Tools software, move the bed (Y-axis) all the way to the rear of the machine.
1. Using the Jog tab on the software, drop the spindle to the lowest Z position.
2. Remove the black plastic cap from the rear of the machine. Store this somewhere safe for reinstallation later.
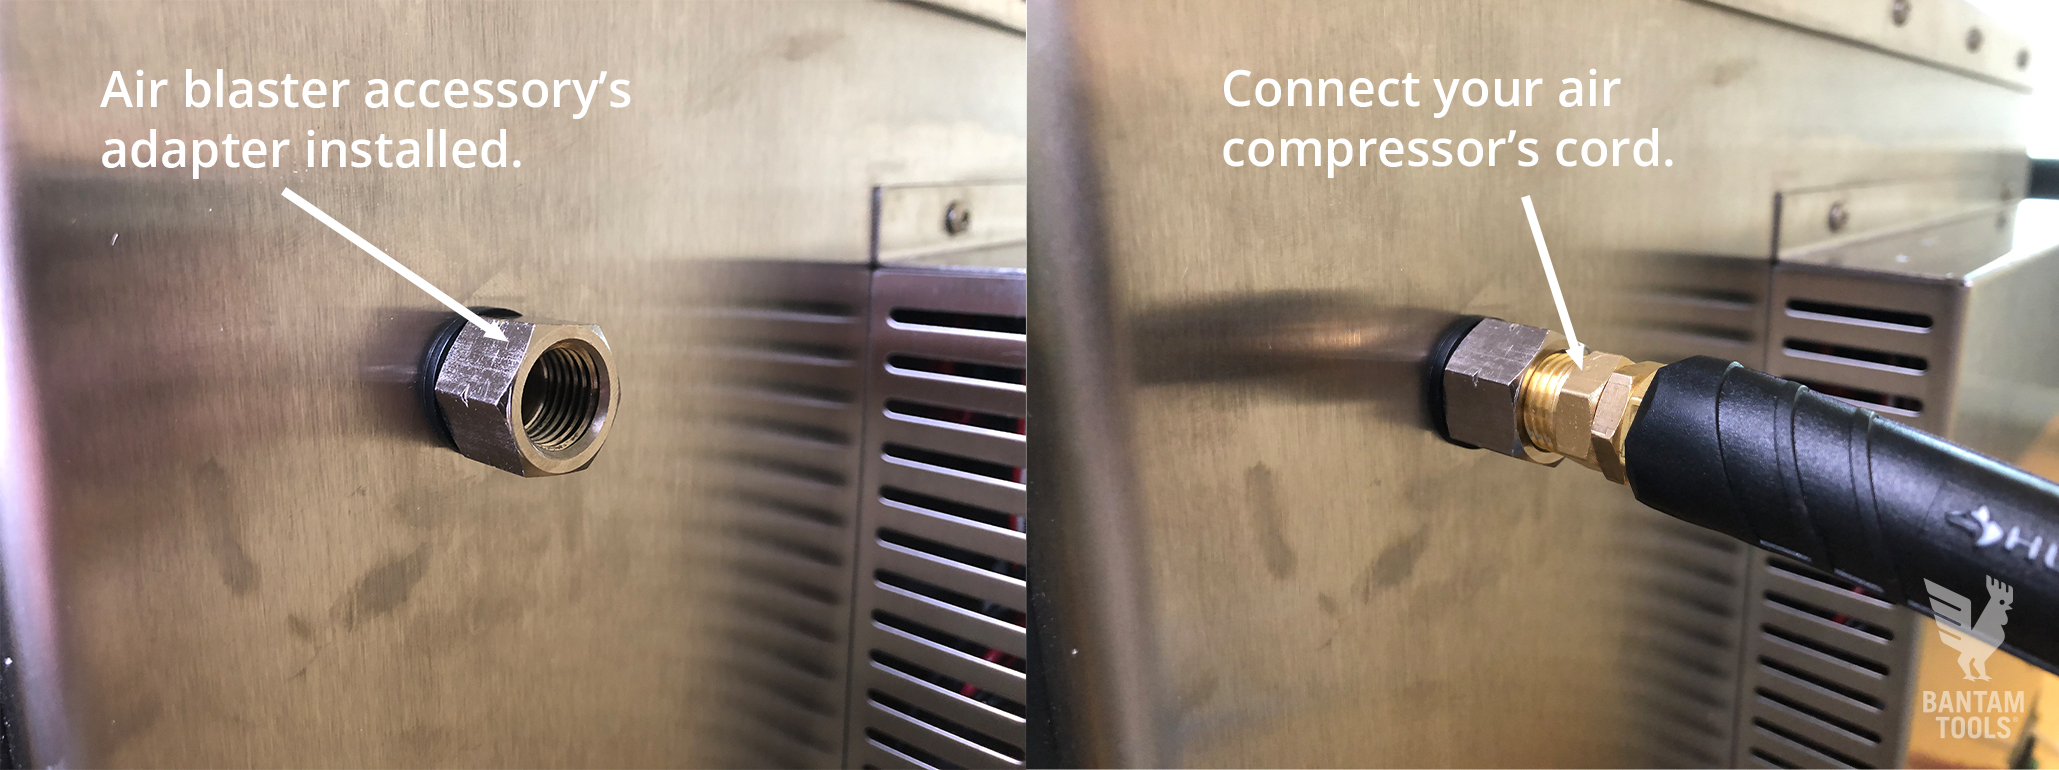
3. Install the adapter such that the end with the blue ring is facing into the machine, with the black washer on the outside of the machine.
4. To affix the hose, simply push it into the blue end of the adapter. To remove later simply push on the blue end and pull on the hose.
5. Next, remove the four screws from the Bantam Tools rooster badge on the spindle house assembly, store these pieces safely for reinstallation later.
6. Install the air blaster manifold onto the spindle house using the long M3 screws. Start by hand tightening the top left screw, followed by the bottom right screw, and then the final two. Then use the 2 mm hex key to finish tightening them. Take care not to overtighten.
7. From the adapter, run the hose along the back of the machine near the gray wiring harness behind the spindle house. Run the remainder of the black hose onto the top of the spindle house and to the left of the stepper motor. Plug the hose into the blue adapter on the air blaster manifold.
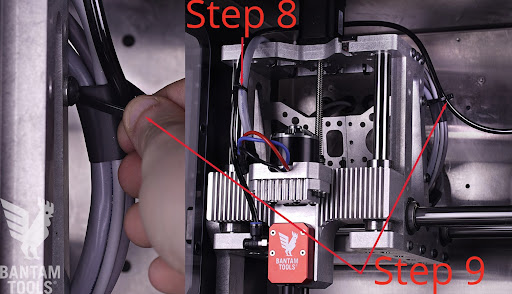
8. Use your first zip tie to attach the hose to the gray wire behind the spindle house, tighten until snug and then trim the zip tie to make sure it will not snag on anything.
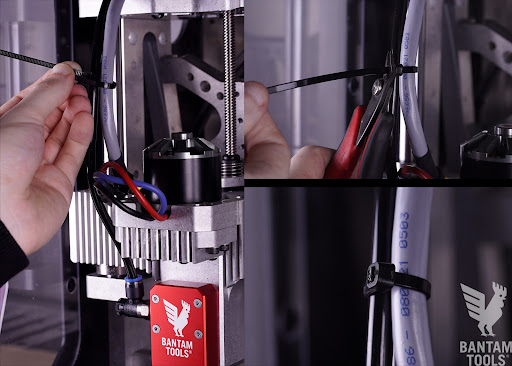
9. Use your second zip tie to attach the hose to the gray wire on top of the spindle house. This zip tie should be loose enough that the air hose can move if necessary.
10. Plug your compressor’s air hose into the adapter on the back of the machine and connect your compressor to power. The air hose adapter may come from the factory with the blue end facing down. If this is the case, rotate the blue end in a clockwise direction until it is facing straight up.
Use your fingers to point the nozzle right where the tooling will meet the milling material. Be cautious around the cutting edge on your tooling. Ideally you’ll want the nozzle to point at the edge of your end mill to keep debris away from the cutter while it’s cutting material.
Additionally, you can adjust the air pressure by twisting the flow-rate knob on the left-hand side of the air blaster manifold. To adjust the airflow, pull the knob out and then turn it clockwise to decrease the airflow or counterclockwise to increase the airflow. The knob should spin with minimal force. If there is resistance, check the knob to make sure it’s not in its locked position or at the maximum or minimum of its adjustment. Once set, press the flow-rate knob back into place.
Note: If you need to check the flow of air, engage the E-stop and carefully place your finger in front of the nozzle to feel the flow of air.
Congratulations! You’ve installed the Bantam Tools Desktop CNC Air Blaster Accessory, and now you’re ready to start milling.
Safety Tips
The Bantam Tools Desktop CNC Milling Machine comes fully enclosed and has a polycarbonate door and safety windows to keep chips and debris inside the machine. However, we still encourage you to always wear protective equipment,(eyeglasses and/or mask) and to keep the Bantam Tools Desktop CNC Milling Machine’s loading door closed while the Bantam Tools Desktop CNC Air Blaster Accessory is connected to a compressor and in use. Always turn off your compressor before opening the loading door. Remember to be careful of the tooling when adjusting the nozzle.
Uninstalling the Bantam Tools Desktop CNC Air Blaster Accessory
Make sure the compressor is disconnected and no longer running before you open the loading door. Then, complete the following steps to uninstall the Bantam Tools Desktop CNC Air Blaster Accessory:
- Disconnect the hose from the air blaster manifold.
- Unscrew the long M3 screws from the air blaster manifold using the 2 mm hex key and remove it from the Bantam Tools Desktop CNC Milling Machine.
- Reinstall the Bantam Tools rooster badge using the four black screws that you removed during installation.
There is no need to remove the hose and the adapter from the back of the machine. These can be left in place, even when the Bantam Tools Desktop CNC Air Blaster Accessory is not in use.
Additional Cleaning Resources
Here are additional cleaning resources we recommend for you to check out. They will help you keep your Bantam Tools Desktop CNC Milling Machine clean, prolong its tool life, and keep it working optimally. Remember, a clean machine is a happy machine.
- Installing & Using the Bantam Tools Desktop CNC Vacuum Accessory
- Clean-Up Wizard
- Cleaning & Maintenance
- Cleaning & Maintenance for CNC Woodworking