Material Location Probing Routines
If you’re working with non-conductive materials like engineering plastics or wood, you can still quickly and easily locate your stock on the T-slot bed. But instead of probing the material, you’ll probe the location of the right-angle alignment bracket (or L-bracket). Remember that the bracket probing routine is a substitute for the material location routine. Since they both return the location of your material, they aren’t meant to be run together.

To locate the L-bracket, follow these steps:
1. Install your L-bracket so that the corner aligns with the front left corner of the T-slot bed or the back right corner. For more info about how to install your bracket, see our Fixturing support guide.
2. After moving the bracket to a new location be sure to realign it. This will ensure accuracy and precision when setting up and machining your job. See our L-Bracket Realignment guide for more guidance.
3. Go to the Jog tab, click Install Tool, and then insert either a 1/4” or 1/8” probe and perform a tool touch-off.
4. Go back to the Initial Setup tab.
5. Click the Brackets and Accessories dropdown menu and select Locate L-Bracket.
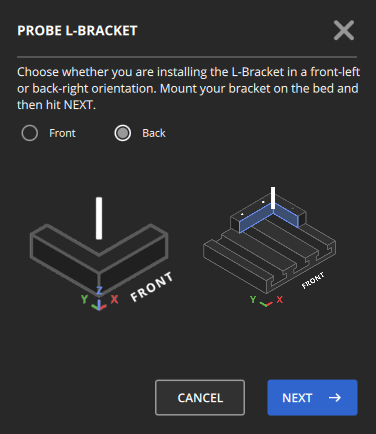
6. Choose where you have installed the L-bracket on the bed and click Next.
7. You’ll be prompted to jog the probe to the inner corner of the bracket below the top surface of the bracket. Click Start and the machine will then probe the inner corner of the L-bracket.
8. When you fixture your nonconductive stock to the T-slot bed, make sure it’s squared and flushed against this inside corner.
Note: Notice that you have the option to locate a PCB bracket as well as the L-bracket. The PCB bracket is a low-profile bracket that comes with our spoilboard accessory for the Desktop CNC Milling Machine. It’s ideal for machining double-sided circuit boards that require a flip operation. To locate this bracket, follow the same steps as above, but in Step 4 click the PCB Bracket button instead.